Release Date: 21 May 2007
Requirements
- For Windows 2000, XP, 2003, Microsoft Windows Services for UNIX (version 3.5)
- Texpress 8.1.008 or later
- TexAPI 3.1.010 or later
Updates / New Features
- Added ability for adoption people to attach pre-adoptive records to POS transactions so that pre-adoptive records can be issued to those entitled to receive them.
- New CVS exceptions module for internal registry management of certificate validation service exception.
- Added restriction that registration records which had a pending maintenance associated with them could not be edited.
- Added new registry entry Group|Default|Table|Default|Do Not Print When Pending|true which disables the ability to print a registration record when it has a pending maintenance associated with it.
- Added new menu option in the POS module to reverse an order.
- Added new Marriage Bookings module.
- Added new Counseling module.
- Record Level Security: Set permissions that control who can view, edit or delete a record on a per user or group basis. Each module now contains a Security tab for specifying per record permissions.
- Report Image Resolution:It is now possible to specify the resolution (height and width) of images when producing a report. If a size is specified, Vitalware will select the smallest image larger than the supplied values. Using this feature it is possible to dramatically reduce network traffic when generating reports:

- ImageMagick Libraries: To provide up-to-date support for emerging image standards (e.g. JPEG 2000) and also to extend the image formats available in Vitalware, the current image display libraries have been replaced with the open source
 ImageMagick libraries. The new libraries support over 100 image file formats, allowing the Multimedia Repository to store and interpret more image formats than previously possible. In particular, support for JPEG 2000 is now available. Vitalware is configured to handle a subset of the available formats by default, namely:
- BMP - Microsoft Windows Bitmap Image
- DCX - ZSoft IBM PC multi-page Paintbrush
- GIF - CompuServe Graphics Interchange Format
- JP2 - JPEG 2000
- JPEG - Joint Photographic Experts Group
- PCD - Photo CD
- PCX - ZSoft IBM PC Paintbrush
- PNG - Portable Network Graphics
- TGA - Truevision Targa Image
- TIFF - Tagged Image File Format
Vitalware will also automatically include any image formats registered by applications installed on your computer. Two new registry entries provide control over which formats are used within an institution:
User|user|Setting|Multimedia|Images|Include|format;...
Group|group|Setting|Multimedia|Images|Include|format;...
Group|Default|Setting|Multimedia|Images|Include|format;...
System|Setting|Multimedia|Images|Include|format;...and
User|user|Setting|Multimedia|Images|Exclude|format;...
Group|group|Setting|Multimedia|Images|Exclude|format;...
Group|Default|Setting|Multimedia|Images|Exclude|format;...
System|Setting|Multimedia|Images|Exclude|format;...where:
format is the image format to include/exclude (see
ImageMagick formats for a complete list of format values).The Include entry is used to add image formats that are supported within your institution, while the Exclude entry allows formats to be removed from the standard list. For more information on these registry entries see
Registry support for multimedia and metadata. - Audio and Video support:The audio and video libraries used by Vitalware have been replaced with new libraries that provide support for a larger range of formats. The supported formats are:
- Audio formats:
- AIFF - Audio Interchange File Format
- AU - Audio File Format
- MIDI - Musical Instrument Digital Interface
- MP3 - MPEG Audio Stream, Layer III
- RMI - MIDI in RIFF File Format
- SND - Sound File Format
- WAV - Waveform Audio
- WMA - Windows Media Audio File
- Video formats:
- ASF - Advanced Streaming Format
- AVI - Audio Video Interleave File
- M1V - MPEG-1 Video File
- M2V - MPEG-2 Video File
- MOD - JVC Everio GZ-MG20U Digital Video File
- MPEG - MPEG 1 System Stream
- WMV - Windows Media File
User|user|Setting|Multimedia|Audio|Exclude|format;...
Group|group|Setting|Multimedia|Audio|Exclude|format;...
Group|Default|Setting|Multimedia|Audio|Exclude|format;...
System|Setting|Multimedia|Audio|Exclude|format;...
and
User|user|Setting|Multimedia|Video|Exclude|format;...
Group|group|Setting|Multimedia|Video|Exclude|format;...
Group|Default|Setting|Multimedia|Video|Exclude|format;...
System|Setting|Multimedia|Video|Exclude|format;...
where:
format is the audio or video format to exclude. - Audio formats:
- Metadata Support: The Multimediamodule has been extended to provide support for the following metadata standards:
- EXIF - Exchangeable Image File Format (Version 2.2, April 2002)
- IPTC - International Press Telecommunications Council (IIM Version 4.1, July 1999)
- XMP - Extensible Metadata Platform (Revision September 2005)
The Multimedia module contains three new tabs (EXIF, IPTC and XMP) that hold the metadata for each of these standards. The metadata is extracted and stored in the multimedia record, making it available for searching and reporting. Metadata is extracted from the following file formats:
Standard
Formats supported
EXIF
JPEG, TIFF
IPTC
JPEG, TIFF, PICT, PS, PSD
XMP
JPEG, TIFF
The image below shows extracted XMP metadata:

The Update resources tool (Multimedia->Update Resource) has been extended to extract metadata from the master image and populate the new metadata tabs. Metadata is also extracted whenever an image is added to the system.
- Embed metadata in image derivatives: Where a master image contains metadata Vitalware can copy part or all of the metadata into derived images. Registry entries determine what is copied. The format of the entry is:
User|user|Setting|Multimedia|Metadata|Embed|type|format|tag;...
Group|group|Setting|Multimedia|Metadata|Embed|type|format|tag;...
Group|Default|Setting|Multimedia|Metadata|Embed|type|format|tag;...
System|Setting|Multimedia|Metadata|Embed|type|format|tag;...
where: type is the type of metadata to embed. Allowable values are EXIF, IPTC or XMP.
format defines the image format for which the metadata will be embedded. A format of Default defines an entry for all image derivatives, an entry of JPEG or any other image type limits the entry to derivatives of the specified type, while an entry of width:height:format further limits the entry to a particular derivative size and type. The tag list depends on the metadata type selected. The list indicates what properties should be embedded in the derivative. The Generate resolution tool (Multimedia->Generate Resolution) has been extended to embed metadata in all derived images based on the registry entry defined above. If the registry entry is not set, no metadata is embedded. For more information on these registry entries seeRegistry support for multimedia and metadata. - Extract metadata into fields in Multimedia repository: Metadata properties can be extracted and placed into fields in the Multimedia repository. The properties to be extracted and the columns into which the values are to be placed are controlled by registry entries. The format of the entry is:
User|user|Setting|Multimedia|Metadata|Extract|type|colname|tag;...
Group|group|Setting|Multimedia|Metadata|Extract|type|colname|tag;...
Group|Default|Setting|Multimedia|Metadata|Extract|type|colname|tag;...
System|Setting|Multimedia|Metadata|Extract|type|colname|tag;...
where: type is the type of metadata to extract. Allowable values are EXIF, IPTC or XMP.
colname is the name of the column into which the values are to be placed. The tag list depends on the metadata type selected. The list indicates what properties should be extracted for inclusion in the Multimedia repository. For more information on these registry entries seeRegistry support for multimedia and metadata. - Media selection dialogue box: The form displayed when inserting media into the Multimedia module has been replaced with a contemporary Windows Explorer dialogue box, allowing a preview of media (images, audio, video). The preview checkbox setting is now preserved between sessions:

Separate dialogue boxes have been designed for adding URL and Reference type media. When adding new media the media type is selected from a button drop list:

- Resolutions Tab: The Resolutionstab in the Multimedia module has been changed to include new properties. These changes include:
- Addition of MD5 Checksum field for all media (useful for checking validity of media).
- Addition of Colour Space field (RGB or CMYK).
- Addition of Image Type field (Monochrome, Greyscale, True Color or Palette).
- Addition of Image Resolution field (Pixels per Inch).
- Changed Bits per Pixel field to Colour Depth (number of bits required to reflect accurately all colours).
- Compression field now contains correct method of compression.
- Number of unique Colours in an image is now calculated correctly.

- Characteristics Tab: Properties from the master image are now extracted automatically and added to fields in the Characteristics tab in the Multimedia module. The following fields are populated:
- Width
- Height
- MD5 Checksum
- File Size
- Image Resolution
- Colour Depth
- Drag and Drop Media and URLs: When adding media to the Multimedia repository it is now possible to drag media files (documents, images, audio, video, etc.) from Windows Explorer and drop them on the media display area on the Multimedia tab. Using this mechanism the media selection dialogue box is no longer required to add media. It is also possible to drag a URL from your web browser and drop it on the media display area.
- User based Dictionary: Any user based dictionary, that is, words added to the dictionary as part of the spell checking process, is now stored under the Windows APP_DATA area. The dictionary was previously kept under the Windows LOCALAPP_DATA area (typically C:\Documents and Settings\username\Local Settings\Application Data\KESoftware). Windows does not make files in the LOCALAPP_DATA area available when Windows roaming accounts are implemented. The APP_DATA area (typically C:\Documents and Settings\username\Application Data\KESoftware) is available to a user on all machines in which they log in. The change means that all words added to the dictionary will now be available regardless of the machine used. In a Citrix environment the same dictionary is now available regardless of the session you receive.
When the Vitalware 2.0.02 Windows client is installed the old user dictionary is not copied to the new location (due to possible security restrictions). If you want to continue with your current user based dictionary, please move all files that end with .udt from the LOCALAPP_DATA area to the APP_DATA area. The exact location of these two areas can be determined by looking up AppData and LocalAppData under \HKEY_CURRENT_USER\Software\Microsoft\Windows\CurrentVersion\Explorer\Shell Folders in the Windows registry.
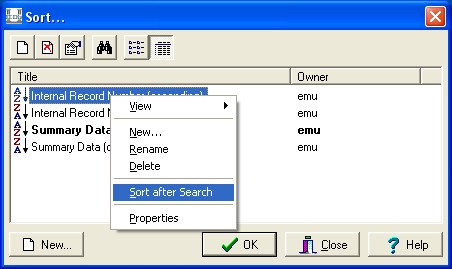
- Automatic sorting of results: A user can now nominate a sort criteria to be run once a search completes. The sort commences immediately after the query completes and can be cancelled if required. The sort is selected from the list of sorts defined for a given user (Tools->Sort Results). The selected sort is highlighted in bold. The entry can be toggled to turn off a given sort:
- Local lookup list defaults: Institutions can now replace the standard system lookup list default values files (stored in luts/default) with their own local instances (stored in local/luts/default). Local default files must have the same name as the standard system default file.
Issues Resolved
| Issue | Resolution | |
|---|---|---|
| If during an edit a product was added to a transaction and then removed it was possible for a refund to appear on the record that should not be there. |
A refund no longer appears. |
|
| If two users were viewing a record and then one edited the record and saved it. When the second operator edited the same record after it had been refreshed, it was possible for order data to be lost. |
Order data is no longer lost. |
|
| When on a counter till and using the mouse to click the event attach button and finding No Matches, it would take two mouse clicks for the cursor to re-appear in a new control. |
The cursor now appears after the first mouse click in a control. |
|
| After singing onto a counter till while trying to save the first entered record and then adding a payment it was possible for the orders to be left with a Pending Payment status. |
The orders no longer have a status of Pending Payment. |
|
| Latin 1 characters (western European) do not display correctly when viewed within Page View mode. |
Latin 1 characters are now shown correctly. |
|
| Restoring a Group while the cursor is in a Link Grid control may generate an access violation. |
The group is now restored correctly. |
|
| If the first control on a tab is a Radio Button, then the first time the tab is visited the first radio button will be activated, rather than the selected one. |
The selected Radio Button is now activated at all times. |
|
| Adding an Also Search facility to a reference field may result in search terms being applied incorrectly to the local fields as well as the reference fields. |
Only the reference fields are now searched. |
|
| If a search term contains a single quote and the Show Search... command is selected, the query displayed will contain some extra characters. |
The correct query is now displayed. |
|
| If Shortcuts are enabled and a record is discarded, an error indicating that "column operation performed before row accessed" may be displayed. |
The error message is no longer displayed. |
|
| If the Security tab is disabled, the Publish on Internet flags may not be set to their default value. |
The default value is always set correctly. |
|
| If form caching is enabled, the current Ditto record may not be set correctly when the form is re-used. |
The correct ditto record is now set. |
|
| If a lookup list value contains an underscore character (_), you will be prompted to insert the value each time the record is saved, regardless of whether the term exists already. |
You are now only prompted the first time the term is saved. |
|
| When viewing records in List mode with Shortcuts enabled, double clicking on a field will not take you to the corresponding field in Detail mode. |
Double clicking now shows the correct field in Detail mode. |
|
| When Saving a POS transaction occasionally duplicate order and ledger records would be created. |
Duplicate records are no longer created. |
|
| When inserting a record if a product was added after entering a fee waived payment type, it fee waived amount did not re-calculate and so an under was recorded against the record. |
The Fee Waived amount rec-calculates to the correct value. |
|
| When entering a transaction it was possible to cancel the transaction after a certificate had been printed. |
A supervisor must give permission for an order to be cancelled where a certificate has printed. |
|
| When receiving a cash payment it was possible to cancel a transaction. |
A supervisor must give permission for an order to be cancelled when cash has been received. |
|
| Switching from Vitalware to another Windows application (via ALT+TAB) and then returning to Vitalware may result in the active form being hidden behind a disabled form. You cannot select the active form as the disabled form cannot be moved. |
The active form is now always displayed as the top level form when Vitalware is activated. |
|
| If the "Save Last Size" Vitalware option is enabled to allow forms to be shown with the last size used, the field level help widow will not display with the correct size. |
The correct size is now displayed. |
Other Updates: Other Client Specific Updates
Updates (MS)
Issues Resolved (MS)
- Double Keying in linkgrids could popup comparison data from a field that was not within the linkgrid.
- After receiving a unique error when keying a registration number it was possible when inserting the next record to get a duplicate irn.
- When reprinting a certificate it was possible to do so without entering a reason.
Updates (QLD)
- Ability to batch marriage certificates added.
- Ability to refund via Credit Card.
Issues Resolved (QLD)
Updates (MB)
- Locations lookup tables standardised across all modules.
- Report available to determine who reprinted certificates.
- LifeData adoptions data added.
- OP name changes now require double keying
Issues Resolved (MB)
- When adding an out of state adoption an amendment form would print.
- When deleting a record, the keying status needs to be set to double keyed.
Updates (TT)
- Added ability to control print locations (queues) via a registry entry.
Issues Resolved (TT)
Upgrade Notes
The upgrade from Vitalware Version 2.0.01 to Vitalware 2.0.02 involves a number of steps. Please follow the instructions below carefully.
Do not skip any steps under any circumstances.
Before proceeding with the update please ensure that a complete backup of the KE Vitalware server exists and is restorable.
- Install Texpress 8.1.008 or greater.
- Install TexAPI 3.1.010 or greater.
- Log in as vw.
- The following steps need to be repeated for each client installed on the Vitalware server.
Please ensure that no one is using the system while the upgrade is underway. - Enter client client
- Enter upgrade-2-0-02
- Go back to instruction 3 to commence upgrading the next client, until all clients are complete.
Vitalware 2.0.02 does not require the new Windows client to be installed on every machine for network installations if the client was installed as part of the Vitalware 2.0.01 upgrade. Updating the network server will install all parts required to access the new image, video and audio libraries. For standalone installations a new client is required on each machine.
Updating existing Multimedia records
Many images already loaded into the Multimedia module may contain metadata. In order to populate the multimedia records with this data it is necessary to perform an update on all the media resources. For some institutions this update may take some time as it involves downloading each master image on the server to a local machine and examining it for metadata. Fortunately Vitalware provides a command that automates this process, the Update Resources command. The following sequence can be used to update all image media records:
- Install Vitalware 2.0.02 client on local machine (or network server for network based installations).
- Start up Vitalware and log in as a user authorised to edit multimedia records (typically vw).
- Open the Multimedia module.
- In the MIME Type field on the Multimedia tab enter image.
- Perform a search (File->Search) to retrieve all image records.
- Select all the records (Select->All Records in Results).
- Run the Update Resources tool (Multimedia->Update Resource->Selected Records).
- The update may take some time if it involves a large number of images. The registry entry:
System|Setting|Multimedia|Colours|Maximum Size
may be used to dramatically speed up the update time for large images. - Once the update is complete the metadata is accessible via the new EXIF, IPTC and XMP tabs.